
Improve your health by adding nutrition-packed, chlorophyll-rich green vegetables to your daily routines, using only a simple blender (no juicer needed). Here’s how.
KEYWORDS: green juice, enzymes, healthy recipes, nutrition, raw food, vegan, vegetable juice, veggie pulp.

This is a basic step-by-step recipe for making both green juice and vegetable pulp at the same time, in one session. My own experiences with this veggie juice and pulp combo have been very good.
This recipe is not meant to provide any “optimal” taste, or any “optimal” nutrition benefits, in terms of the exact combination of the vegetables used. Rather, its purpose is merely to illustrate the exact steps needed to produce this vegetable combo, so that anyone can gradually integrate the production of green juice and veggie pulp into their daily life, as easily and efficiently as possible.
It is my intention to provide other, more “optimized” recipes in the future, where the exact vegetables used are “harmonized” in various ways, in order to provide special health benefits. Thus, one might have, for instance, one series of recipes for different Ayurvedic constitutions (Kapha, Vata, and Pitta), or for various conditions (“Arthritis”, “Iron Deficiency”, etc). And then one might also, of course, have other recipes that are focused more on tasting good than on any particular nutritional value.
So here is the basic process of producing a daily dose of a healthy green juice and a moist, nutritious veggie pulp.
Contents
- PART 1: MINDSET AND MOTIVATION
- 1.1 Daily Habit or Not?
- PART 2: APPLIANCES AND UTILITIES
- 2.1 Two ‘Blender Veggies Boxes’
- 2.2 One Blender
- 2.3 One Sieve
- 2.4 One Cheese-Making Cloth
- 2.5 One Cooking Pot
- 2.6 One Spoon
- 2.7 Two Big Bowls
- 2.8 Two Small Bowls
- 2.9 Two Knives
- PART 3: THE BASIC JUICE & PULP COMBO RECIPE
- 3.1 Target Amounts
- 3.2 Time Required
- 3.3 Step 1A: Take Out the Vegetables
- 3.4 Step 1B: Select the Veggies You Want to Use
- 3.5 Step 2A: Cleanse All Leaves in Water
- 3.6 Step 2B: Wash the No-Leaf Veggies
- 3.7 Step 3: Blender Jug and Cutting Board
- 3.8 Step 4A: Chop the No-Leaf Veggies
- 3.9 Step 4B: Rinse and Chop the Leaves with Stalks
- 3.10 Step 4C: Add Water and Do Blending #1
- 3.11 Step 5A: Rinse the Leaves without Stalks
- 3.12 Step 5B: Add Leaves and Do Blending #2
- 3.13 Step 6A: Set Up Your Straining Station
- 3.14 Step 6B: Make the Green Juice and Veggie Pulp
- 3.15 Step 7A: Gently Heat the Green Juice
- 3.16 Step 7B: Drink the Green Juice
- 3.17 Step 8A: Put the Veggie Pulp in Two Small Bowls
- 3.18 Step 8B. Prep the Veggie Pulp
- 3.19 Step 8C: Storing and Eating the Veggie Pulp
- 3.20 Step 9: Wash and Rinse all Utilities
- CONCLUSION
PART 1: MINDSET AND MOTIVATION
Mastering the Law of Attraction is certainly not required in order to make this green juice and veggie pulp combo. It can be done by anyone.
However, benefiting from consuming this combo is dependent on the Law of Attraction. For if you don’t believe that this green drink and veggie pulp will be very good for you, then it may not be very good for you.
Fortunately, though, the reality is that, unlike many other foodstuffs, most people do think that veggies in general are healthy things to consume, and that drinking green juices and eating vegetable pulp are beneficial activities. It’s just that many people do not really enjoy eating them, especially in their raw, hard, and cold original state.
So by providing a more “palatable” version of green juice (since it is not cold) and a more easily chewable veggie mix (the veggie pulp, which also does not have be eaten cold), there should be more opportunity for people to improve their health, regardless of whatever else they are eating.
Daily Habit or Not?
For this green juice and veggie pulp to positively affect your health, it is important to produce it daily. Freshly produced juice and pulp should be consumed as quickly as possible, so that as much nutrition is maintained as possible.
The longer you store it, the more it oxidizes and goes bad. Thus, there is little scope for producing a larger amount which you can refrigerate for days.
So if we are drinking green juice for health, timing is important. My overall recommendation is that both the juice and a substantial amount of the pulp is consumed within one hour of production.
In other words, it is a good idea to plan your day so that the production of the veggie combo can immediately (within say, 30-45 minutes) be followed by one of your main meals of the day. So drinking the green juice might then be thought of as a trigger and an energy booster for you, so that you can start cooking one of your main mails.
These are my suggestions in more detail:
- The juice should be consumed immediately after production. Wait no longer than 10 minutes to drink it.
- Half of the pulp should be consumed within one hour of production.
- The other half of the pulp can be refrigerated for up to 12 hours and be consumed at the next meal.
PART 2: APPLIANCES AND UTILITIES
In order to be able to produce this veggie juice and pulp combo in your own kitchen, you need certain required appliances and utilities, each with certain specifications: a blender, a sieve, a cheese-making cloth, a cooking pot, etc.
Two ‘Blender Veggies Boxes‘
In order to make your daily veggie combo, you need to streamline the process as much as possible. This means, practically, that each step of the process must be so simple and easy that you cannot convince yourself that you should skip it today (or any day).
So to avoid a “whimsical” selection of vegetables, where the vegetables are placed in different parts of the fridge, and where you have to search for them individually, we need to reorganize things. This not only saves time, but it more importantly maximizes the probability that we actually will proceed and make the veggie combo TODAY.

A good idea then is to use a dedicated “Blender Veggies Box“. Or, actually, two of them. That way we do not have to look around in the fridge to search for possible veggies to include, or to individually move them from the fridge to our counter.
Instead, we just know where our two boxes are located, and we just grab them and put them on our counter. Now we know that we have all our ingredients for our daily combo. So if we just can get those two boxes out of the fridge and onto our counter, then half our job is done.
Box #1 is for stalky veggies (celery, parsley, etc.). And it should be long enough that the long stalks can fit into it easily.
Box #2 is for leaves (spinach, arugula, etc.) and various salads. Since leaves typically are more “malleable” in terms of the space they may occupy, Box #2 need not be as elongated as Box #1 must be. However, because Box #1 is already occupying, say, a third of a fridge shelf already, it does make sense to buy two equal sized boxes, so that both can fit on the same shelf.
One Blender
There are two main requirements for the blender. First, it has to have a two-liter jug (0.52 US gallons). Second, the jug should preferably be either of glass or stainless steel, for maximum food safety. Plastic jugs are not recommended.

Note that the blender does not have to be a very expensive one. There is absolutely no need for any expensive VitaMix machine or anything like it.
Our purpose is not to disintegrate the vegetables as much as possible, but to avoid disintegrating them. For our goal is not just to produce juice, but to produce a nice, firm, and moist pulp as well. So the pulp needs to have some “rigidity” and “coarseness” to it, and NOT be processed too much, or too efficiently.
One Sieve
In order to separate the vegetable fiber from the green juice, you need a sieve. There are basically two main requirements of such a sieve.
Requirement 1: The first main requirement is that it must fit into your cooking pot. And in order to do that its diameter must be at least one cm (0.39 inches) less than the inner diameter of your cooking pot.
However, a too small cooking pot will not fit with the size of the sieve that is required. So if you don’t have a cooking pot with a diameter of, say, at least 20 cm, and also a reasonably tall one, then it’s best to first choose a suitable sieve, and only after that buy a cooking pot that has a one or two cm larger diameter.
Requirement 2: The second main requirement is that it has to be able to hold all the vegetable mix that is produced by the blender. Since the minimum recommended volume of the blender is 2 liters (0.52 US gallons), and the produced volume of the vegetable mix typically is around 1.3 liter (0.34 US gallons), you basically need a sieve that can hold at least 1.7 liters (0.45 US gallons) or so.
The problem is just that most ads for sieves and strainers do not have accompanying product information that tells the buyer how much volume they can hold. But we can make an estimate in the following way. Since most sieves are shaped almost like a half moon, we simply calculate the “average” volume of the sieve as:
real radius = real diameter / 2
average diameter = real radius + real height
average radius = average diameter / 2
average volume = 2.095 x (average radius)3
And if we express our values in decimeters instead of in centimeters, the volume will automatically be expressed in liters. For one cubic dm is equal to one liter.

Example: My own sieve has a diameter of 21 cm (8.3 inches), and its height is 9 cm (3.54 inches). How much vegetable mix can it hold?
Answer: First convert the values to decimeters. This produces a real diameter of 2.1 dm and a real height of 0.9 dm.
real radius = 2.1 / 2 = 1.05 dm
average diameter = 1.05 + 0.9 = 1.95 dm
average radius = 1.95 / 2 = 0.975 dm
average volume = 2.095 x (0.975)3 = 2.095 x 0.927 = 1.94 dm3 = 1.94 liter
So my own strainer can hold 1.94 liters, theoretically. But in real life we need some margins. Therefore, in practice it can probably only hold, say, 75-80% of that, or 1.5 liter (0.40 US gallons). This is simply because we need some “elbow room” when we are stirring the vegetable mix to squeeze out the juice.
One Cheese-Making Cloth
In order to produce the best juice and the best pulp, it is not enough to just use a sieve. You also need a cheese-making cloth inside the sieve for the straining.
Such a cloth (typically in a square format) needs to be substantially larger than the diameter of the sieve in order to work properly. A good estimate of its size can be obtained simply by doubling the diameter of the sieve.
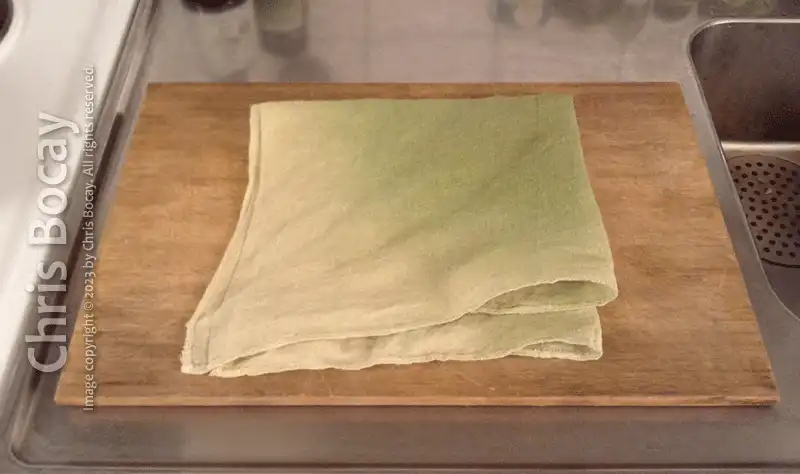
So if the diameter of your sieve is, say, 20 cm (7.9 inches), then you would need a square cloth with a side of something like 40 cm (15.7 inches). My own cloths are typically 45 x 45 cm (17.7 x 17.7 inches), and those fit perfectly with my sieve, which has a diameter of 21 cm (8.3 inches).
Other important requirements for your cheese cloth may be that it is made out of organic cotton or linen, and that it is unbleached, dye-free, and odorless.
One Cooking Pot
Since our intention is to produce a heated green juice, we need a cooking pot that is to work as a collector for the vegetable juice. By having a cooking pot instead of just some other bowl we can very swiftly and easily move it to our stove to heat it up when our straining process is over.

The cooking pot need to be large enough for the sieve to fit in, and tall enough that the bottom of the sieve doesn’t touch the liquid that is accumulating in the pot. The minimum inner diameter of such a cooking pot is probably around 20 cm, and the minimum height is probably around 14 cm or so.
My own cooking pot has an inner diameter of 22 cm (8.7 inches) and an inner height of 16 cm (6.3 inches).
One Spoon
You need a special spoon to squeeze out more juice from the vegetable mix that has been produced by your blender. Such a spoon can be made either of wood or of stainless steel. Plastic should be avoided.
There are other criteria of such a spoon. First of all, the length of the spoon matters. It should have a relatively large bowl, and thus its length must be, say, at least 22 cm (8.7 inches) or so. My own spoon has a length of 23.5 cm (9.2 inches).

As already noted, we want a spoon with a larger bowl. This is because we want as much contact area with the vegetable mix in the sieve as possible. Thus, minimum dimensions of the spoon’s bowl are 8 x 5 cm (3.1 x 2.0 inches) or so. My own wooden spoon has a bowl with the dimensions 9 x 6 cm (3.5 x 2.4 inches).
Another thing to keep in mind is the curvature of the bottom outer surface of the bowl. Since our goal is to press the vegetable mix against the walls of the sieve in order to squeeze out the juice, it is important that the curvature of the bottom outer surface of the spoon matches, as closely as possible, the inner curvature of the walls of the sieve. That way, we maximize the contact area between the spoon and the vegetable mix and the sieve, and it makes the overall process more efficient.
Two Big Bowls
All veggies must be cleansed first. Some veggies, such as celery, may be scrubbed with a rough brush under the faucet. However, when it comes to veggies with leaves this is not possible.
Therefore, we must put them in a big bowl of water for a few minutes in order for all impurities to be removed. For practical reasons, though, all veggies with leaves cannot be placed in the same bowl. So we need two bowls.
The first big bowl (Big Bowl #1) is for leaves with a hard stem (e.g., parsley). These all come from Blender Veggies Box #1, and should be put into the bowl of water with the leaves first, and stay there for a few minutes. Afterwards, they should be placed in the sieve and fresh water should be applied, to cleanse them even more. They are then ready to be chopped, after which they can be put into the blender.
The second big bowl (Big Bowl #2) is for leaves without a hard stem (spinach, arugula, etc.). These all come from Blender Veggies Box #2. When these leaves have been in the water a few minutes, they should be placed in the sieve and fresh water should be applied, in order to remove any remaining dirt. They are then ready to go directly into the blender.
I recommend a size of about 3-4 liters (0.75-1 US gallons) for each of these big bowls.
Two Small Bowls
When the veggie pulp is produced, we need to divide it into two halves. This is because we want to spread out our eating of the vegetable pulp, so that the body gets fresh vegetables at least twice a day.
This is why why need two small bowls for temporary storage, each of which should be at least 0.75 liters (0.20 US gallons) in volume. Recommended material: stainless steel.
Two Knives
Depending on which vegetables you use in your combo, you may need different types of knives. This is because you want to make the job easier for your blender, and not overload it. There are basically three possible scenarios: no knife, big knife, and small knife.

1. No knife. If you decide to only use vegetables that have leaves and no hard stems (such as spinach or arugula), you may not need any knife at all.
2. Big knife. For most fresh vegetables a chef’s knife is the best tool. So cutting parsley stems or celery stems or broccoli, a big chef’s knife is an appropriate tool for the job.
3. Small knife. Some veggies may be hard to cut with a big chef’s knife. For example, the hard part of an asparagus may be better cut with a small, finely serrated knife instead. And if your celery stems have lost their stiffness, they may be easier to cut with a small serrated vegetable knife than a big chef’s knife.
PART 3: THE BASIC JUICE & PULP COMBO RECIPE
The step-by-step process of producing the green juice and pulp combo is described here in Part 4. The assumption here is that you already have bought the vegetables and have put them into your “Blender Veggies Box” in the fridge.
Target Amounts
This recipe is based on volume. The premise is that you have filled a two-liter blender jug full with vegetables. Typically, the chopped stems occupy, say, max 20% of the space, while the leaves occupy the remaining space.

The amount of green juice produced by this recipe is approximately 0.5 liter (0.13 US gallons).
The amount of vegetable pulp that this recipe produces is approximately 0.4 liter (0.11 US gallons).
Time Required
This is typically a 30-minute process (when you get used to it). But it may take 40-45 minutes if you are a beginner.
Step 1A: Take Out the Vegetables
The first step is to move your vegetables from your fridge to your kitchen counter.
Although this may sound like a ridiculously easy thing to do, it is, for many people, a psychologically difficult task to accomplish, especially if they have all of their veggies spread out in the fridge in different places.
So it is important to put your vegetables in those Veggie Boxes that I have talked about above. That makes this important step much easier. So now just take out your two Veggie Boxes and put them on your countertop.
Step 1B: Select the Veggies You Want to Use
For the purpose of illustrating the process, I will here suggest a number of vegetables that I myself am using on a regular basis. Note though that these vegetables are not explicitly “harmonized” or “optimized” to work in conjunction with each other, either in terms of nutritional value or in terms of taste.
Also note that you may be sensitive to some of these vegetables. So if you know that you are allergic to, say, celery, then you should not use that yourself in your own green juice and veggie pulp production.
Here are some basic ingredients:
Broccoli (1): 3 florets of medium size.
Broccoli (2): 3 cm (1.18 inches) of the stem
Parsley: 4 stalks with leaves
Asparagus: 3 spears
Celery: 2 medium stalks
Kale: 50 grams of leaves
Spinach: 50 grams of leaves
Arugula: 30 grams of leaves
Step 2A: Cleanse All Leaves in Water
In order to chemically dissolve any impurities, all leaves should be put in lukewarm (body temperature) water for a few minutes.

Leaves with stalks (from Veggie Box #1) go into Big Bowl #1. Make sure that all leaves and stalks are under the surface of the water.
Leaves without stalks (from Veggie Box #2) go into Big Bowl #2. Make sure that all leaves are wet, so that the cleansing power of the water can act on any impurities.
Step 2B: Wash the No-Leaf Veggies
There are two ways to cleanse those veggies that have no leaves (broccoli, asparagus, etc.). The quick way is to simply brush the vegetables with your dedicated veggie brush under the faucet. This is indeed a speedy way to get the job done, and it doesn’t require a third bowl either. But it doesn’t chemically remove all impurities.
A more time-consuming way to cleanse the no-leaf veggies is to also do the same thing as you did with the leaves, namely to put them in water a few minutes first (in Big Bowl #3). This enables the water to chemically dissolve many of the impurities that may be present on the surface of the veggies. And then, after a few minutes, you can also brush those vegetables with your veggie brush under the faucet to physically remove any dirt particles that still may remain.
Step 3: Blender Jug and Cutting Board
In order to save time, place your blender jug next to your cutting board on your countertop. That way you can quickly transfer the newly chopped vegetables directly into your blender jug, without needing to place them in another bowl.
Step 4A: Chop the No-Leaf Veggies
Chop the no-leaf veggies in small pieces, and then place them directly in the blender. Having cut the vegetables in smaller pieces will make it easier for the blender to mix everything together.

If you do not cut everything into small pieces, there is a chance that the blender will not have the power to do its mixing. Consequently, the blender might simply stop in the middle of its blending. There is also a theoretical possibility that the blender might be destroyed in some such cases. So I recommend manual chopping.
Step 4B: Rinse and Chop the Leaves with Stalks
After having been immersed in water for a few minutes, wash and rinse those veggies that have stems that are still attached to the leaves (in Big Bowl #1).
Then chop the stems in small pieces and put them directly into the blender. The leaves are not necessary to cut.
Step 4C: Add Water and Do Blending #1
It may be difficult for your blender to process a two-liter jug full of raw stems and leaves. Therefore, it is a good practice to divide the blending into two phases: first blend the “hard” veggie parts, and then blend all the leaves.
So now add 0.5 liters (0.13 US gallons) of water in the blender jug, and run it in the blender for approximately 10 seconds. Then bring back the jug near your cutting board.
Step 5A: Rinse the Leaves without Stalks
Now rinse all the leaves that do not have any hard stems (in Big Bowl #2). It is typically not necessary to cut the leaves in smaller parts.
Step 5B: Add Leaves and Do Blending #2
Now just add all the rinsed leaves (from Big Bowl #2) into the vegetable liquid in the blender jug and run it for about 15 seconds. The vegetable mix is now ready for straining, where we separate the juice and the pulp.
Step 6A: Set Up Your Straining Station
Now quickly remove your cutting board from your countertop, and then, in the same spot, assemble your straining equipment.
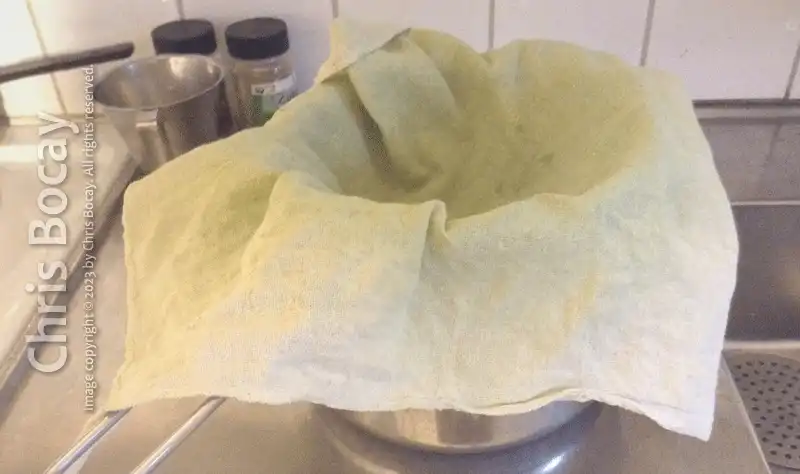
First get your cooking pot. Then put your sieve on it. And then put the cheese-making cloth in the sieve. And, finally, fetch your straining spoon that you press out the juice with.
Step 6B: Make the Green Juice and Veggie Pulp
Now quickly pour out the vegetable mix from the blender, so that it ends up in the cheese-making cloth in the sieve. Then run your special spoon along the wall of the sieve in order to squeeze out the green juice.
When the remaining pulp feels dry enough (usually after a minute or so), you can stop running the spoon along the wall of the sieve. The juice and pulp combo is now produced, in its original state.
Put the sieve and its veggie pulp aside for now, so that we as quickly as possible can start drinking our green juice, for maximum nutritional benefits.
Step 7A: Gently Heat the Green Juice
(If you don’t like your juice heated, you can skip this step and go directly to Step 7B.)
Move your cooking pot (with the green juice inside) to a heating element on your stove, and turn it on. Heat your green juice to max 45° C (113° F). Use your index finger to check that the temperature is a few degrees warmer than body temperature.
Note that the green juice (as well as the veggie pulp!) are very sensitive to heat, in terms of its nutritional value. All the valuable enzymes are starting to degrade drastically the closer you come to 50° C (122° F), and are almost completely destroyed at 60° C (140° F).
Also note that this denaturing process is irreversible, so you can’t “repair” the enzymes just by cooling the juice down to 45° C (113° F). So if you want your precious enzymes to be alive and active, be sure to never go above 45° C (113° F) when you are heating your green juice (or your pulp). Then you will have a very substantial amount of the enzymes intact.
Step 7B: Drink the Green Juice
Pour the green juice into your drinking cup and enjoy. Be sure to drink it up within 10 minutes or so, for maximum health benefits.

Step 8A: Put the Veggie Pulp in Two Small Bowls
Now return to the sieve and the cheese-making cloth, which still has the vegetable pulp in it. Use your special spoon to transfer the pulp into two small bowls.

As described above, the general plan is to consume one bowl of pulp within one hour of production and the other one within 12 hours, or, at the very latest, within 24 hours.
Step 8B. Prep the Veggie Pulp
If you are using many goitrogenic vegetables in your veggie combo (such as kale, broccoli, celery, radishes, etc.), they may interfere with your thyroid metabolism, especially if you are low on iodine.
In such cases, it is therefore prudent to add extra iodine to your diet, in order to minimize any such metabolism interference.
My own practice is that I every day take an extra 200 micrograms of iodine (from kelp), since I always have several goitrogenic vegetables in my veggie combos.
And since I am using capsules with kelp that can be opened, I simply spread out the kelp in equal proportions in both my small bowls. Thus, I get 100 micrograms of iodine in Small Bowl #1, and 100 micrograms of iodine in Small Bowl #2.
Step 8C: Storing and Eating the Veggie Pulp
All veggie pulp must be consumed within 24 hours, and preferably within 12 hours.
The best practice is to consume Small Bowl #1 within one hour, and Small Bowl #2 within 12 hours.
My recommendation is that you under no circumstances save your vegetable pulp more than 24 hours. Both the green juice and the veggie pulp should be considered to be very sensitive in terms of their nutritional benefits, for both are continuously being oxidized and degraded as time goes by. So quick consumption is a must.
Step 9: Wash and Rinse all Utilities
All utilities must be cleansed after each session, so that they are ready for action the next day.
Quickly rinse the cheese-making cloth under the faucet to remove any remaining pulp and juice. Then squeeze out the water from the cloth and hang it up to dry.
Also quickly rinse the sieve and place it in your dish-drying rack.
CONCLUSION
As my own testing of this green juice and veggie pulp combo has shown, it has the power to potentially transform your health. But the requirement, of course, is that you will have to modify your daily schedule somewhat in order to get it done every day.
However, that should be no big deal. For once you have tried it out for a few days and (hopefully) experienced similar improvements in your own health to those I myself experienced, it should be rather easy just to continue.
If you have questions about any part of this process, you can either just leave a comment below, or connect with me on Twitter.
Chris Bocay


Leave a Reply